In the field of literature and art studies, there is a kind of "contrast" research, such as: "Comparing Chinese and Western Literature," "Comparison of Ancient and Modern Paintings," and "Comparison of Ancient Egypt and Chinese Shang Dynasty Culture". There are also different levels of comparison between graphic image design and production. From this period onwards, this column will develop a comparison of the production status and results shown by different graphic and graphical software under the same simulation theme.
Simulated snow scene
Falling snow is a climate phenomenon in the north of nature in winter. Here, I use CorelDRAW and Photoshop digital image technology to simulate the state of falling snow in nature.
First, simulate the effect of falling snow in CorelDRAW11
1. Run CorelDRAW11 and create a new page. Select the "File → Import" menu command to import a "Landscape" image, as shown in Figure 1.
Landscape image artwork
2. Make the imported picture selected, and then click the "Bitmap → Creativity → Climate" command. In the pop-up "Climate" dialog box, set its parameters: predict the snowflake; strength is 5; size is 10; random 3, as shown in Figure 3, click the "OK" button to complete the set of snowflakes, when the screen has the effect of falling snow.
3. Select the “interactive transparent tool†in the toolbox and drag it from the bottom to the top of the graphic to make a gradient transparent effect. The image is shown in Figure 2.
Gradient effect
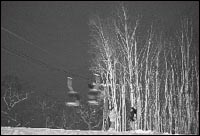
Second, in the Photoshop production simulation snowfall effect
1. Run Photoshop. Select the "File → Open" command to open a landscape picture. Then press the "D" key to set the foreground color to black and the background color to white.
2. Activate the Layers panel. Click the "Create New Layer" button in the Layers Panel and create a new "Layer 1". Then select "Edit" → "Fill" command, use "50% gray" fill.
New layer filled with gray
3. Select the "Filter → Sketch → Plotter" command, and in the dialog box, set the Line Length value to 15, the Light/Dark Balance value to 30, and the Line Direction to the right diagonal line. After that will get the effect shown in Figure 3.
4. Select the "Selection → Color Range" command, select "Highlight" in the "Select" drop-down list of the dialog box, and then get the white selection area, press "Delete" to clear the selection.
5. Use the key combination “Shift+Ctrl+I†to select the opposite area of ​​the image. Press “D†to set the foreground color to black and the background color to white. Then press “Ctrl+Delete†to fill the selection area with white. Then press “Ctrl+D†to cancel the selection area.
final effect
6. Select the "Filter → Blur → Gaussian Blur" command and set the Blur "Radius" value to 0.5 pixels in the dialog box. Then select the "filter → sharpening → USM sharpening" command, set the value in the dialog box is 100%, the radius is 3, the threshold is 10, click "OK" button to get the results shown in Figure 4 effect.
Third, compare
CorelDRAW snow production process is relatively simple to achieve steps, the picture is more quiet.
Picture description: The snow flies silently in the light blue twilight, softly falling on my palm, my cheeks, and then merging with my heart into the snow that you have long forgotten.
The steps to achieve the snow scene in Photoshop are slightly more complicated than those in CorelDRAW. The effect of the picture is more awkward and there is a sense of snow and snow.
Picture description: Wind, you blow it up; Snow, you let it go. I am a winged migratory bird and watch the road to return home on the dying branch...
Dog Bath Tub,Dog ,Bathtub,Tub Faucet
Dog Bath Tub,Metal Cabinet Co., Ltd. , http://www.nbbcabinet.com